Tuesday, January 27, 2009

Ubuntu 9.4 Alpha 3 Available

The Ubuntu developers are moving quickly to bring you the absolute latest and greatest software the Open Source Community has to offer. The Jaunty Jackalope Alpha 3 will be the third alpha release of Ubuntu 9.04, bringing with it the earliest new features for the next version of Ubuntu.

Highlights of this version are: updated packages, X.Org server version 1.6, a new style for notifications and notification preferences, Linux kernel version 2.6.28, and ext4 installation support.

Note that this is an alpha release and should therefore not be installed on production machines. The final stable version is expected on April 23, 2009.

Tuesday, January 20, 2009

Bootable Floppy disk

A boot disk is a floppy disk that contains, at the very least, an operating system. Boot disks are useful in case of a hard drive failure. With a boot disk, you can place a floppy disk in your computer [if you still have a floppy drive]when it boots up and still have access to your computer.

While I highly recommend putting more than just the basic operating system on a boot disk, such as useful batch files, useful commands, device drivers, etc., the following line *will* make a floppy disk bootable:

SYS C: A:

Monday, January 19, 2009

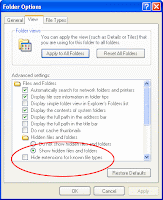
Changing file extensions in windows XP

Sometimes it may be necessary to change the file extension to open the file or files with a different application or in a different method. Here's the procedure : 

  1. Go to the Tools menu.
  2. Select Folder Options.
  3. In the 'View' tab, uncheck the option "Hide extensions for known file types" and apply.


  4. Now rename the file by replacing the existing extension with the one you need.

Sunday, January 18, 2009

Certified Ethical Hacking [CEH]

Certified Ethical Hacking is for an individual who is usually employed with the organization and who can be trusted to undertake an attempt to penetrate networks and/or computer systems using the same methods as a hacker. Illegal hacking (ie; cracking computer systems) is a felony in the United States and most other countries. But when this type of hacking is done by request and under a contract between an Ethical Hacker and an organization, it is legal. The most important point is that an Ethical Hacker has authorization to probe the target.

Certified Ethical Hacking is for skilled professionals who understand and know how to look for the weaknesses and vulnerabilities in target systems and uses the same knowledge and tools as a malicious hacker.

Certification is achieved through training at an ATC (Accredited Training Center) or self-study. If students choose to self-study, in order to sit for the exam they must fill out an application and also have documented 2 years of information security work experience. Both CEH v4 and v5 utilize EC-Council's exam 312-50. The exam consists of 125 (v4) or 150 (v5) multiple-choice questions, and students are given up to three or four hours, respectively, to complete the examination. The exam costs US$250, and is administered via computer at an EC-Council Accredited Training Center, Pearson VUE, or Prometric testing center (in the United States)

Saturday, January 17, 2009

Steps to follow to dry your Cellphones

If you’ve dropped your cell phone in water, or just gotten it wet, then you’ll want to make sure you follow a series of steps to ensure it will continue to operate.

1. Do not, repeat, DO NOT try to suck water from any device with a vacuum cleaner that is not designed to suck water. What where you thinking? This could cause a fire hazard, and could electrocute you! Only use a “wet/dry vac to do this as it is designed to work with wet liquids”
2. You have to pull the battery first thing!!! Not in a few min, but the sec you pull the device from the water. This will help prevent shorting of the device.
3. Letting a phone or any other device like it sit and dry on it’s own will cause corrosion of the electronic and at that point, you should get a new one.
So, how do you recover a wet cell phone? This is your best bet. Oh, and how do I know what I’m talking about? I have re-coved high tech electronics that have been submersed in water about a hundred times and I work with R/C subs and boats modified with things like cameras and other high tech electronics that are designed to sink and be recovered, and as much as you like to try, you can’t always keep it water proof. Note: I have only lost two items I could not get to work again out of about 100 + sinks.
So on to the recovery:

1. Remove the power ASAP. Pull that Battery!!!
2. Pull the sim card “if you have one!”
3. Pour rubbing alcohol in to the device. Fill it or submerse the device in a bowl full of the alcohol and try to get out all the bubbles. Why rubbing alcohol? The alcohol displaces the water from the circuit boards.
4. Soak the phone for just a few seconds to get it all in there. Now take the device and drain the alcohol from it. Shake it a bit to get as much of the liquid out as you can. You can also use air in a can to gently blow it out.
5. Alcohol will evaporate on it’s own in a short amount of time. I often will continue to shake the item and inspect it to make sure it is dry. Note, sometimes you will have liquid in the LCD and this can be tricky trying to get it out, if the alcohol can displace it, it will help.
6. Let sit for several hours to make sure it is very dry.
7. Put the battery back in and see what happens. I have on my own recovered several phones for friends this way but this will only work, if it is done right after you pull the phone from the water. If you wait, corrosion will set in and the phone is most likely done fore.

SHIFT, CAPSLOCK, and CONTROL keys stop working in Ubuntu

About once a week, my , , and keys stop working. This is an Ubuntu issue, not a hardware issue. This issue has been recurring through several point releases of Ubuntu.

I was rebooting every time this issue occurred; that was a serious annoyance. Now, however, I have a much better fix.
The command `setxkbmap` resets the keyboard map and resolves the issue without a reboot.

I hope that this bug is eventually found and fixed, but now it’s reduced from a major annoyance to a very minor issue.


Office 14 -- Successor of office 2007

Catch the glimpse of not so hyped secretive project of Microsoft on OFFICE 14 -- successor of office 2007


Wednesday, January 14, 2009

SHUT DOWN PC FASTER

  1. Start 
  2. Run
  3. Type-Regedit.
  4. Navigate to HKEY_LOCAL_MACHINE/SYSTEM/CurrentControlSet/Control.
  5. Click on the "Control" Folder.
  6. Select "WaitToKillServiceTimeout"
  7. Right click on it and select Modify.
  8. Set it a value lower than 2000.

Thats it guys and see the difference when you shut down your PC.

Sunday, January 11, 2009

Activate Automatic Login on WinXP


If you’re sick of having to click a button or enter a password every time WinXP boots up.Here’s a quick and easy way to eliminate this step. It involves editing the Windows registry, though, so you must be careful to follow these directions exactly.


Step1: Click the Start button and select Run. Type “regedit” in the field and click OK.

Step2: Browse to the registry key titled   “HKEY_LOCAL_MACHINE\SOFTWARE\Microsoft\WindowsNT\CurrentVersion\Winlogon.”

Step3: Double click DefaultUserName and enter your account name. Click OK. Then double click     DefaultPassword, enter your current password and click OK. If DefaultPassword does not 
               appear, create the value by clicking the Edit menu, selecting New and then selecting 
               String  Value. Name the value as DefaultPassword. Once it’s created, double click Default 
               Password  and enter your choosen password.

Step4: Double click AutoAdminLogon and enter “1” in the Value Data box. Click OK. If 
                AutoAdminLogon does  not appear, create it using the same  method in the step
                above and set the value as 1.

Step5: Close the Registry Editor and reboot your computer. You should 
                log  into  Windows automatically.

Bimmy (Sonumour@gmail.com)

Problem in opening the drive in a single window on double-click in WinXP

I had encountered such type of problem many a times.As for me  the expected behaviour is that each drive opens in the same window until a user has explicitly set the option Open Each Folder In Its Own Window.
Under File menu >> Tools >> Folder Options in General.

Why It is that drive opens in new window?

It happens when a program or virus tries to edit the File Folder or Drive shell entries to add more context menu items and set them as default for double click action.
Lets see how we can fix this.

Fix:

First Method:
1. Open Start >> Run and type regsvr32 /i shell32.dll
2. press ok
3. You will see a message DllRegisterServer and DllInstall in shell32.dll succeeded
4. that’s it
 
Second Method:
1. Open Start >> Run and type regedit
2. Navigate to HKEY_CLASSES_ROOT/Directory/Shell
3. Double click the default key type none and press ok.
4. now navigate to HKEY_CLASSES_ROOT/Drive/Shell.
5. Double click the default key type none and press ok.
 
Third Method:
If you don’t want to play with the registry ,you can run the following command instead at
Run Prompt: ( Open Start >> Run )
“reg add hkcr\drive\shell /ve /d none /f” (without double quotes)

Fourth Method:
1. Open Start >> Run and type regedit
2. NOw Press Ctrl+F
3. Type "mountpoints2" (without quotes)
4. Delete all the mountpoints2 entries in the registry
5.that's it  


I hope at least one of the above method may work for you to fix the trouble, if not please let us know.
If still after following the above you are not able to solve the problem then update your antivirus and run a complete scan and make your system virus free.
 
 
Note: After editing the registry you may need to restart your system, so that the changes can reflect


Bimmy(sonumour@gmail.com)


Configure Laptop as a WIFI router


HERE'S STEP-BY-STEP INSTRUCTIONS TO USE A LAPTOP AS WIFI ROUTER AND ACCESS NET THROUGH IT ON ANY OTHER WIFI ENABLED DEVICE IN AD-HOC MODE....

1. Go to Start, Control Panel, Network Connections. Right click the wireless connection (it should be called “Wireless Network Connection”) and select properties.

2. On the window that will show up, click on the Wireless Networks tab. Make sure that no wireless networks are being listed under "Preferred Networks". If you see networks there, remove them one by one.

3. Click on Advanced button.Select “Computer-to-computer (ad-hoc) networks only” and click on Close.

4. Now click on Add. It is thru this window that we will create our wireless network. You will need to fill out the following:

* Network Name (SSID): This will be the name of your network. This is how your computers will call your network. 
* Network Authentication: Open.
* Data encryption: WEP.
* Uncheck the “The key is provided for me automatically” box.
* Configure your network key. This is a password that will be used to encrypt data transferred on your network, preventing neighbors from surfing the web for free and also preventing people to view or even delete your files, if file sharing is enabled on your network. You must fill this field. The key must have five alphanumerical characters. 

5. After clicking Ok, you will see your network listed under Preferred Networks. Your network will still be listed with a red “x”, this is absolutely normal.

6. Now you need to share your Internet connection. Pay attention because this is done on network card that has your broadband Internet connected, not on your wireless network card. Go to Network Connections (Start, Control Panel), right click the network card where your broadband Internet is connected to and then choose Properties. On the window that will show up, click on Advanced tab.There, check the “Allow other network users to connect thru this computer’s Internet connection” box and make sure that the “Allow other network users to control or disable the shared Internet connection” is unchecked.

7. Click Ok and now you will see “Shared” under the name of the network connection where your broadband Internet is connected to (usually called “Local Area Connection”). Your wireless connection will still be listed as “Not Connected”; this is absolutely normal. It will only change to “Connected” after any other computer has joined your network.

8. Now that your host computer is correctly configured, you need to configure the other computers that will have access to your wireless network.Now that you have configured the host computer, it is time to configure the other computers that will have access to your wireless network. This configuration is very simple; just follow these very simple steps:

9. If you configured your host computer correctly, your wireless network will now be listed on the available networks list of all computers that have a wireless network card within the range of the card installed on your host computer. Just click the wireless network icon available on the task bar or double click your wireless connection on Network Connections (Start, Control Panel) to see a list of wireless networks available.

10. After double-clicking your network, Windows will ask you the network encryption key.

11. After clicking Ok, your network status will be listed as “Acquiring Network Address” and then it will change to “Connected”.

12. After this point you will have access to the Internet using the Internet connection available on your host computer. Test your network by opening your web browser (Internet Explorer, Firefox, etc) and trying to open a well-known website like Google.

13. Now on your host computer its wireless connection will also appear as “connected”. Like we said before the wireless connection on the host computer will appear as “connected” only when other computers are connected to it.

14. In order to prevent instability issues on your wireless network, we recommend you to remove all other networks that may appear listed under Preferred Networks on all computers. This can be done right clicking your wireless connection on Network Connections 
(Start, Control Panel), selecting Properties, then on the window that will show up click on Wireless Networks tab. Remove all other networks listed under Preferred Networks but your own network.


Bimmy (sonumour@gmail.com)

Wednesday, January 7, 2009

Basics of Dual Core Process computer

The computer has been one of the most amazing and fruitful discoveries man has ever made. It has revolutionized the way man does his things. The way he eats, drinks, sleeps and even thinks. And computer itself has evolved over the years. From the Eniac I to the hand-held palmtops in executives` hands today, computer has changed with the technology. And it has changed our lives too.

The latest addition to this revolution of technical upgrading of computers is the dual-core processor technology. It refers to the CPU (Central Processing Unit- the brains of the computer) that possesses two independent and complete execution cores for each of its two processors. The concerned CPU contains two combined processors along with their cache memories and their respective controllers integrated into a singular circuit (commonly known as a silicon chip). 
The dual-core process computer is suited to multitasking and handling miscellaneous tasks (often unrelated to each other). Because its CPU has two completely independent execution cores and both have independent interfaces to the front bus, it has excellent capacity to execute several programs and tasks simultaneously. Similarly, dual-core process computers may have more processor cores which is actually named as a multi-core process computer. These are highly efficient machines to conduct intensive tasks of computing or program execution at the same instance of time.

The Pentium dual-core process computer is the most preferred brand of computer in the market. It has x86-architectured microprocessors integrated onto its circuit. The 32-bit Yonah processors are a base for mobile computers while the 64-bit Allendale processors are maintained for the desktop computers. Both have absolutely different architecture as far as microprocessor technical build is concerned.

By early 2007, Intel decided to launch dual-core process computers in the field of notebooks or laptops too. This was a very important and vital decision as there were no other rivals in this phase if the market of computer architecture. Intel had only decided to launch the dual-core process computer system applying to notebooks on the behest of notebook or laptop manufacturers. The first processors to appear in notebooks using the dual-core process computer technology were the Pentium T2060, T2080 and a 32-bit Pentium M based on the Yonah core with a 1 MB L2 cache, instead of the usual 2MB cache memory.

Intel had forced a return of the Pentium brand to the market arena on 2006 with a host of low-cost single core Conroe-L core architecture processors with a 1 MB cache. These were numbered `1` to distinguish them from dual core process computer cores that had been labeled with the digit `2`.

More recently, on June 3, 2007, Intel released desktop dual-core processors from the Pentium brand. They were named as E2140 and E2160. September 2007 saw the late release of a better and updated model named E2180. These processors support the Intel64 extensions, because of their Allendale derived Core architecture. The power of these dual-core process computers was very imminent as most companies` demands exceeded supply over these multi-processor machines.

Dual-core process computer systems have taken over the world of computing today. As of its multi-tasking ability, it has gained world-wide acclaim due to its efficient, quick and yet superior quality program execution and task completion abilities. Heavier programs and complex games may be run with these dual-core process computer systems at the regular pace of conventional single-core processor systems did with light programs on the execution chart.

The age of computers had begun a long time back. But the age of sleek and efficient computing with the help of razor-edge technology has just begun with the dual-core process computer systems.

Tuesday, January 6, 2009

A Brief Introduction into TCP/IP

Many people may not know what TCP/IP is nor what its effect is on the Internet. The fact is, without TCP/IP there would be no Internet. And it is because of the American military that the Internet exists.During the days of the cold war, the defense department was interested in developing a means of electronic communication which could survive an attack by being able to re-route itself around any failed section of the network.They began a research project designed to connect many different networks, and many different types of hardware from various vendors. Thus was the birth of the Internet (sorta). In reality, they were forced to connect different types of hardware from various vendors because the different branches of the military used different hardware. Some used IBM, while others used Unisys or DEC.

TCP (Transmission Control Protocol) and IP (Internet Protocol) were the protocols they developed. The first Internet was a success because it delivered a few basic services that everyone needed: file transfer, electronic mail, and remote login to name a few. A user could also use the “internet” across a very large number of client and server systems. 
As with other communications protocols, TCP/IP is composed of layers. Each layer has it’s own responsibility:

IP is responsible for moving data from computer to computer. IP forwards each packet based on a four-byte destination address (the IP number). IP uses gateways to help move data from point “a” to point “b”. Early gateways were responsible for finding routes for IP to follow.

TCP is responsible for ensuring correct delivery of data from computer to computer. Because data can be lost in the network, TCP adds support to detect errors or lost data and to trigger retransmission until the data is correctly and completely received.

How TCP/IP works

Computers are first connected to their Local Area Network (LAN). TCP/IP shares the LAN with other systems such as file servers, web servers and so on. The hardware connects via a network connection that has it’s own hard coded unique address – called a MAC (Media Access Control) address. The client is either assigned an address, or requests one from a server. Once the client has an address they can communicate, via IP, to the other clients on the network. As mentioned above, IP is used to send the data, while TCP verifies that it is sent correctly.

When a client wishes to connect to another computer outside the LAN, they generally go through a computer called a Gateway (mentioned above). The gateway’s job is to find and store routes to destinations. It does this through a series of broadcast messages sent to other gateways and servers nearest to it. They in turn could broadcast for a route. This procedure continues until a computer somewhere says “Oh yeah, I know how to get there.” This information is then relayed to the first gateway that now has a route the client can use.

How does the system know the data is correct?

As mentioned above, IP is responsible for getting the data there. TCP then takes over to verify it.

Encoded in the data packets is other data that is used to verify the packet. This data (a checksum, or mathematical representation of the packet) is confirmed by TCP and a confirmation is sent back to the sender.

This process of sending, receiving and acknowledging happens for each individual packet sent over the Internet.

When the data is verified, it is reassembled on the receiving computer. If a package is not verified, the sending computer will re-send it and wait for confirmation. This way both computers – both sending and receiving – know which data is correct and which isn’t.

One nice thing about this protocol is that it doesn’t need to stick to just one route. Generally, when you are sending or receiving data it is taking multiple routes to get to its destination. This ensures data accuracy.

Just the facts:

TCP/IP addresses are based on 4 octets of 8 bits each. Each octet represents a number between 0 and 255. So an IP address looks like: 111.222.333.444.

There are 3 classes of IP addresses:

Ranges starting with “1” and ending with “126” (i.e.. 1.1.1.1 to 126.255.255.254) are Class A

Ranges starting with “128” and ending with 191 (i.e.. 128.1.1.1 to 191.255.255.254) are Class B

Ranges starting with 192 and ending with 254 (i.e.. 192.1.1.1 to 254.255.255.254) are Class C ( You will notice that there are no IP addresses starting with “127”. These are reserved addresses.)

Calculating an IP address

One of the things that always confused me was how to convert IP address to their Binary form. It is quite simple really. IP addresses use the Binary numbers (“1”s and “0”s) and are read from right to left.

Each position in the binary address corresponds to a number, from 1 to 128 and look like this:

128 64 32 16 8 4 2 1

To calculate an address, simply add the numbers where a “1” appears.

For example, the following:

00001010 works out to 10. Like this:

0 0 0 0 1 0 1 0
128 64 32 16 8 4 2 1

You can see that the “1”s line up with the 2 and 8 – when you add 2 plus 8 the answer is 10.

Since an IP address contains 4 of these octets, it can be displayed in binary like:

00001010.00001010.00001010.00001010

Therefore, IP Address 10.129.254.1 would be converted to:

00001010.10000001.11111110.00000001
(8+2) . (128+1) .(128+64+32+8+4+2).(1)

While it’s not important for the average person to know how to figure this stuff out, it is important for someone setting up a small network. That is because TCP/IP also uses what are called subnet masks to determine which addresses are valid.

Metadata scrubber for MS Word

Metadata in Word documents can reveal information that the creator of the document had no intention to distribute. This ranges from information about the author to comments and a unique identifying ID. It can lead to all kind of privacy leaks. Microsoft even recommends to distribute documents in paper form only on their website.

Doc Scrubber is a Microsoft Word metadata scrubber which can be used to analyze and scrub Word documents. The software program is compatible with Windows 98, ME, NT, 2000 or Windows XP. It has been designed with simplicity in mind. It basically is managed by the two buttons Analyze and Scrub. 
Analyze lets the user analyze one specific Word document to see if and which information it reveals in the metadata. The Scrub button is where the real action takes place. It can be used to scrub a single document, all Word documents in a folder or selected documents of folder.


By default a new document will be created after the scrubbing with the metadata removed which is another option that can be changed in the program’s settings. The user is given the choice to remove only the metadata that he selects.


A total of 13 different settings can be removed from the selected Word documents including subject, keywords, comments and several dates including creation and last saved data. Three of those 13 options can reset data back to their default values. This includes setting the template back to normal.dot, the revision count to 1 and the total editing time to 0.

Friday, January 2, 2009

G1 powered by Android.....

G1 Phone Design for Google by Mike and Maaike
 
 
This is a G1 phone designed for Google by two San Francisco designers, Mike and Maaik